What you'll need to repair your clothes
Here is some of the equipment that you may need when repairing or embroidering your own clothing:
- Embroidery thread
- Scissors
- Embroidery hoop
- Embroidery pen
- A garment
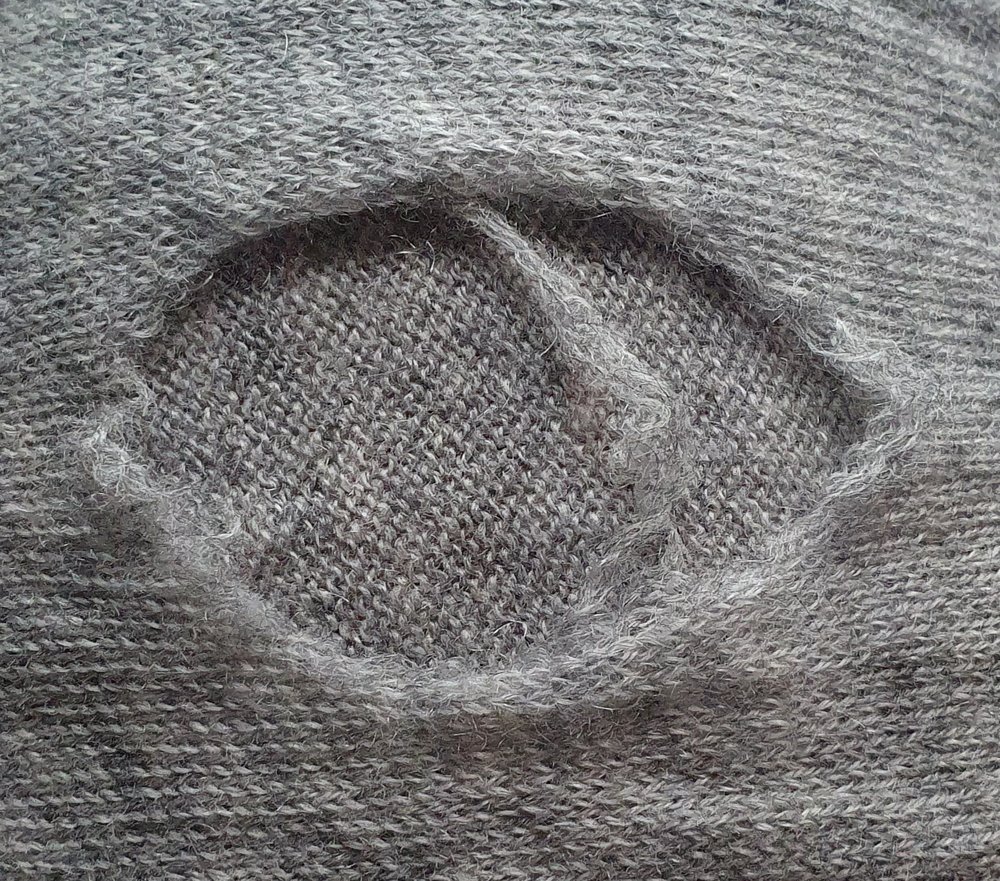
How to cover a hole or imperfection in your clothes
The way we cover an imperfection is determined by the size of the hole. In my demonstration, I'll be covering quite a large hole on the elbow of the garment. You can use this technique on a hole of any size and in any part of the garment.
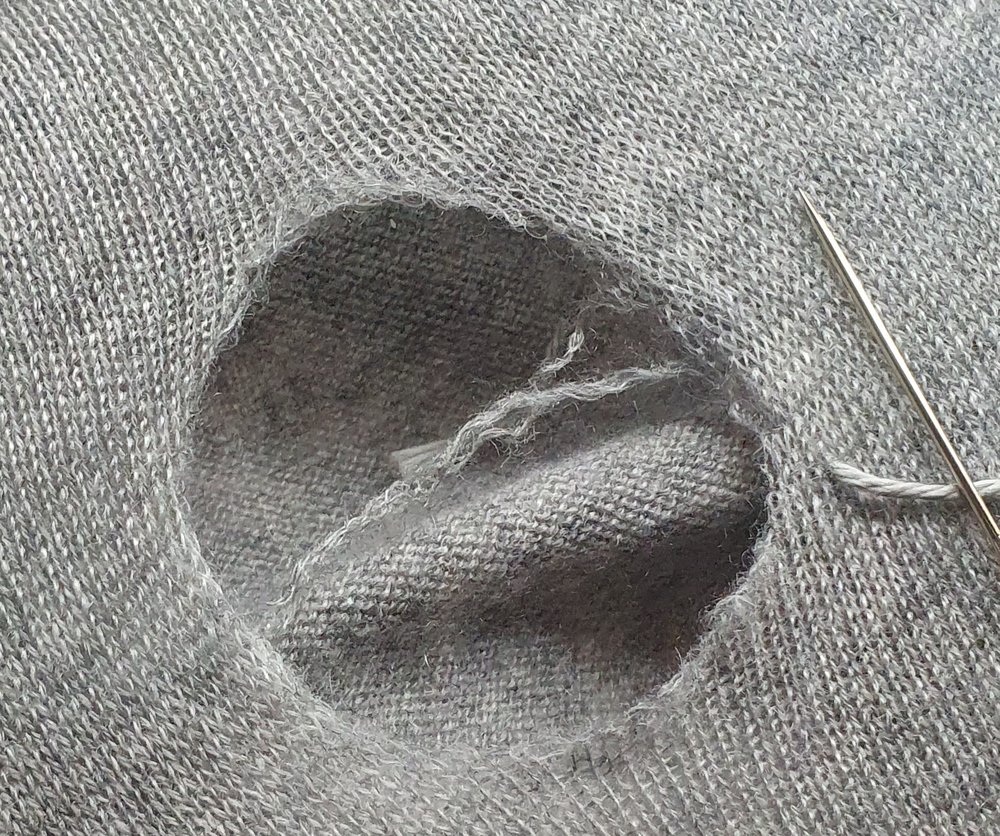
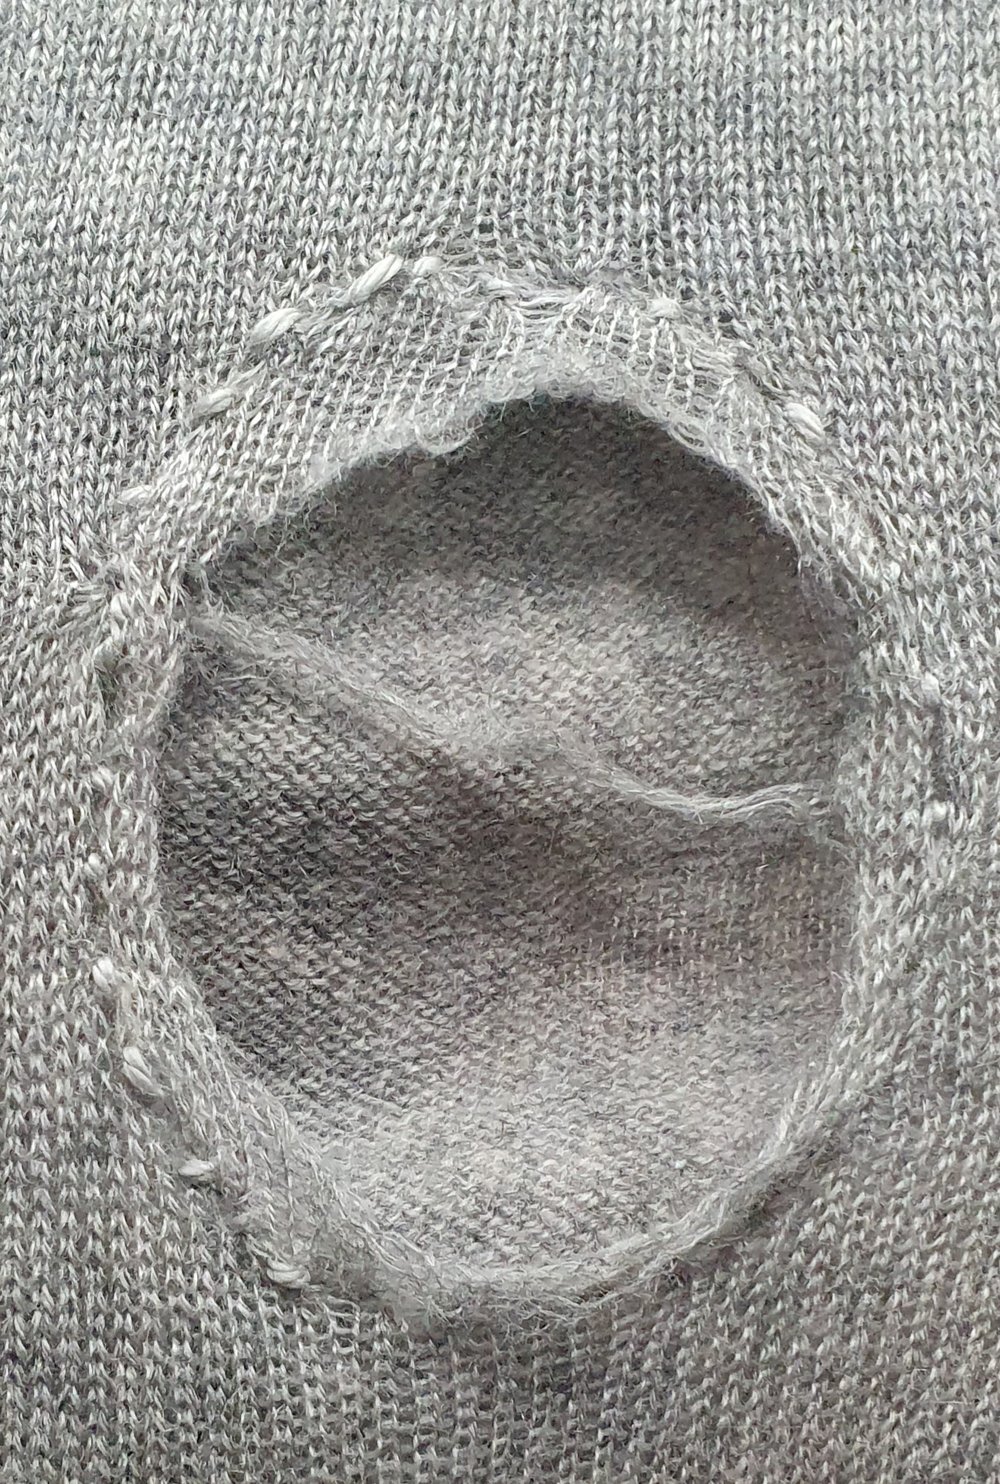
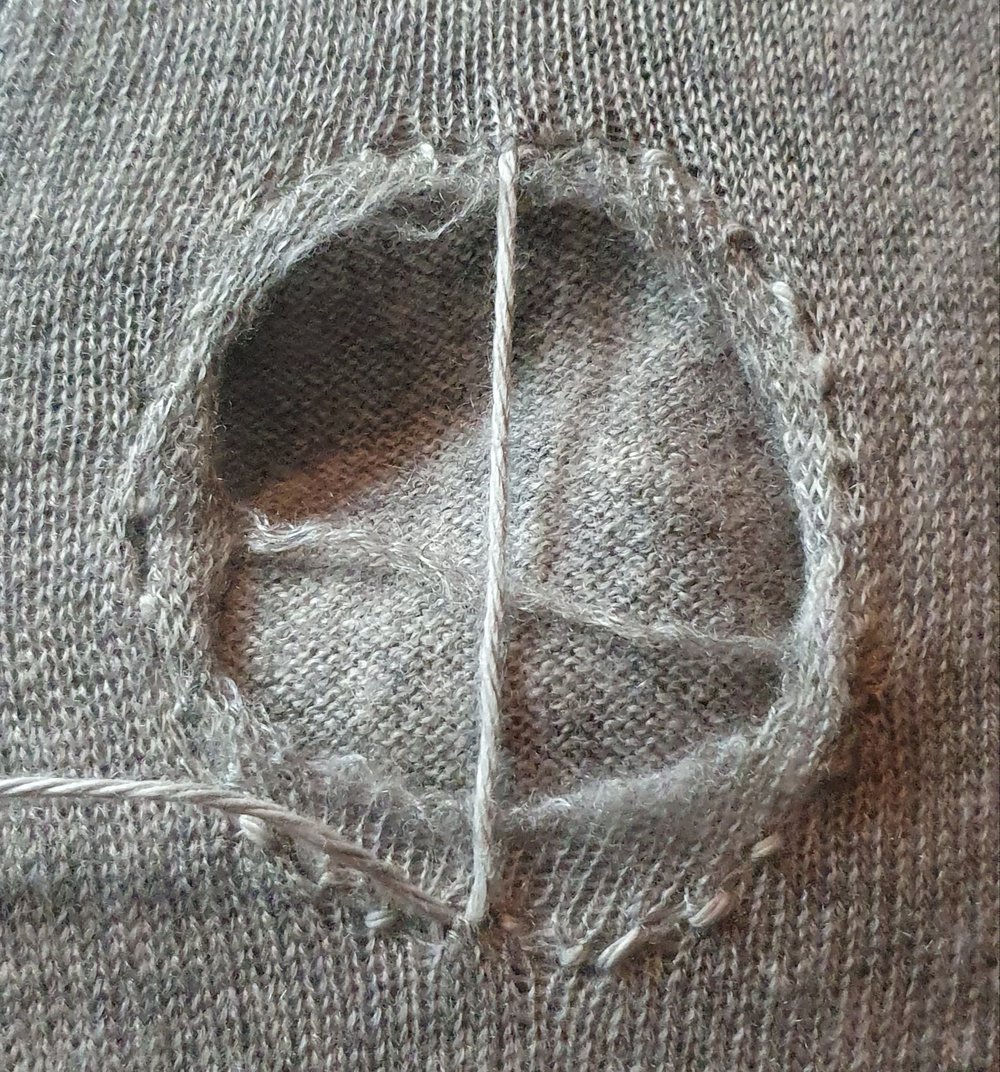
Step 1: Back stitch around the hole
To begin with, I used a back stitch to trace around the stable edges of the hole. This created a guideline and some structure so that the edges of the hole wouldn't fray as I filled in the gap.
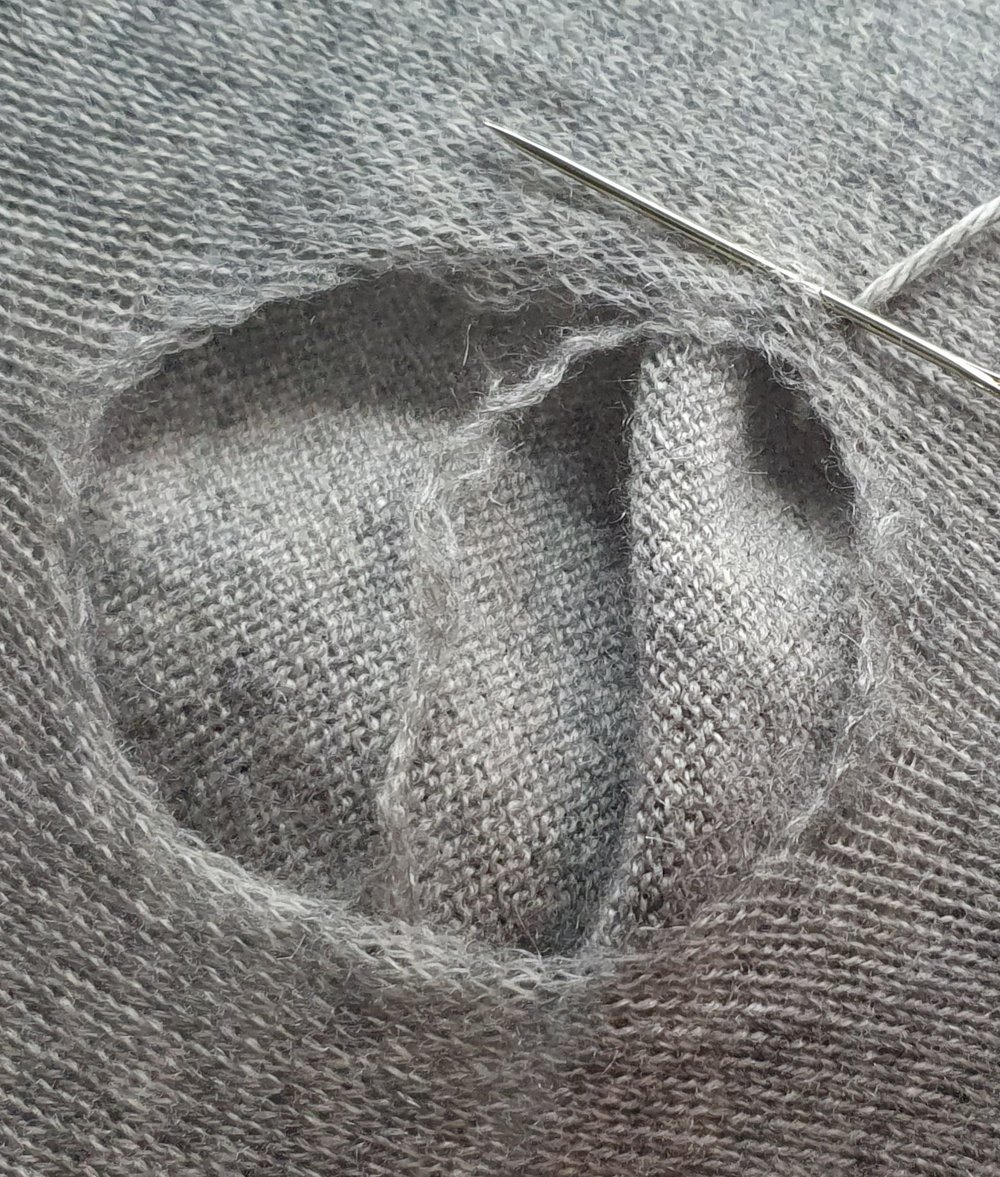
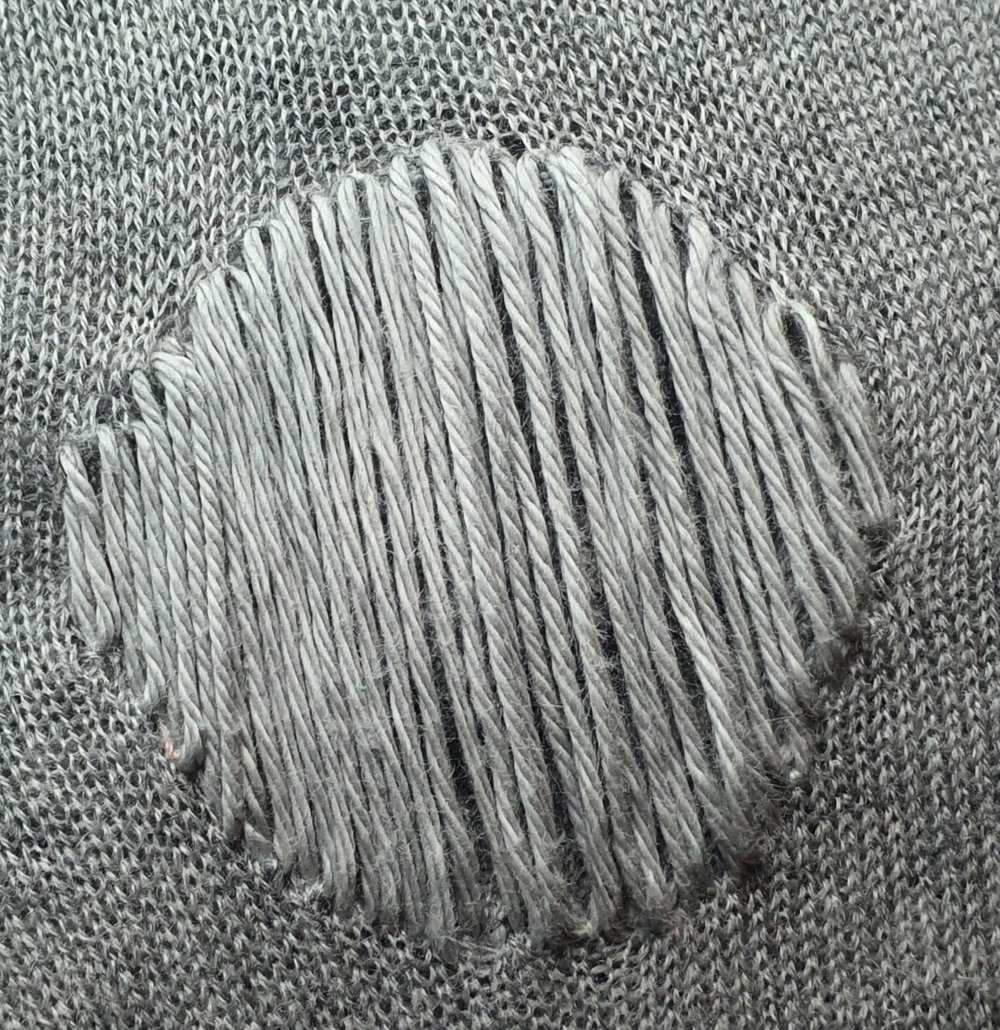
Step 2: Create a base structure
After this, I created the base structure for the woven technique that I was using to cover the hole by creating vertical stitches from one side of the hole to the other. I started in the middle, as this would allow for the stitches to become shorter as I got to the edges of the circle.
The stitches I created starting outside of the structural back stitch. The stitches weren't pulled tight as this would distort the fabric, they simply sat on the surface of the fabric. When creating the stitches, they shouldn't create another line of stitches across the back, but look like a ladder on the front.
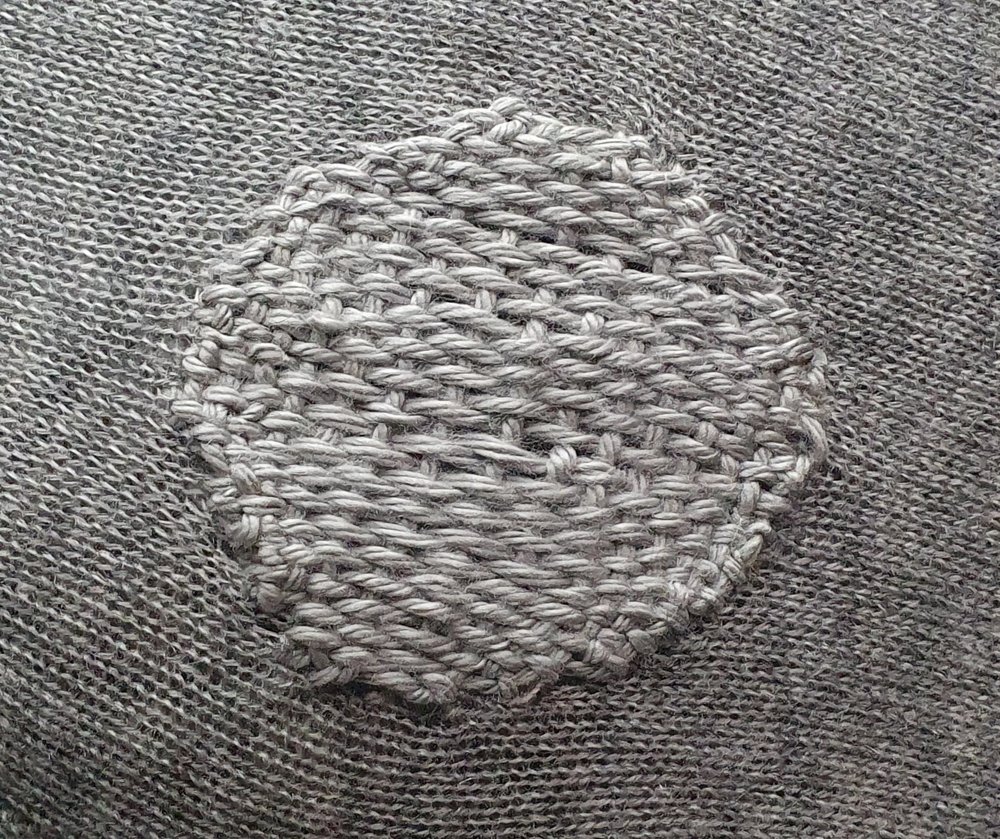
Step 3: Fully cover the hole
To fully cover the hole, I then wove the same thread through the base, going over and under. Start in the middle of the circle again, as this will make sure no edges are missed. As you're weaving, push the horizontal thread upwards so they sit snugly together. This will make sure that the whole is fully covered.
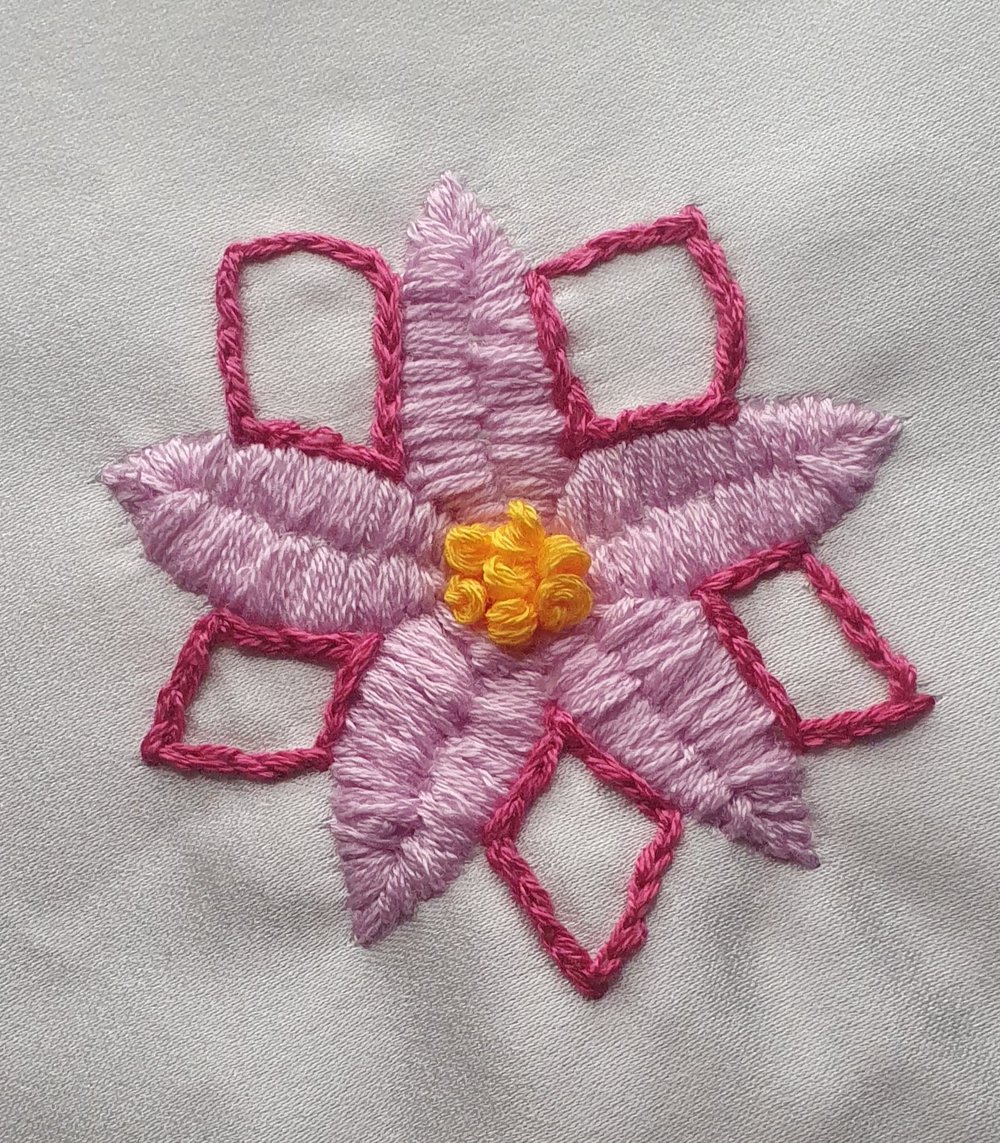
Examples of flower embroidery
After the hole is fully covered, you can leave the garment like this if you prefer. But I like to add a little personal touch to my clothing!
Here, I'll show some examples of easy embroidered flowers that you can use in any combination to help the repair on the clothing blend into the background.
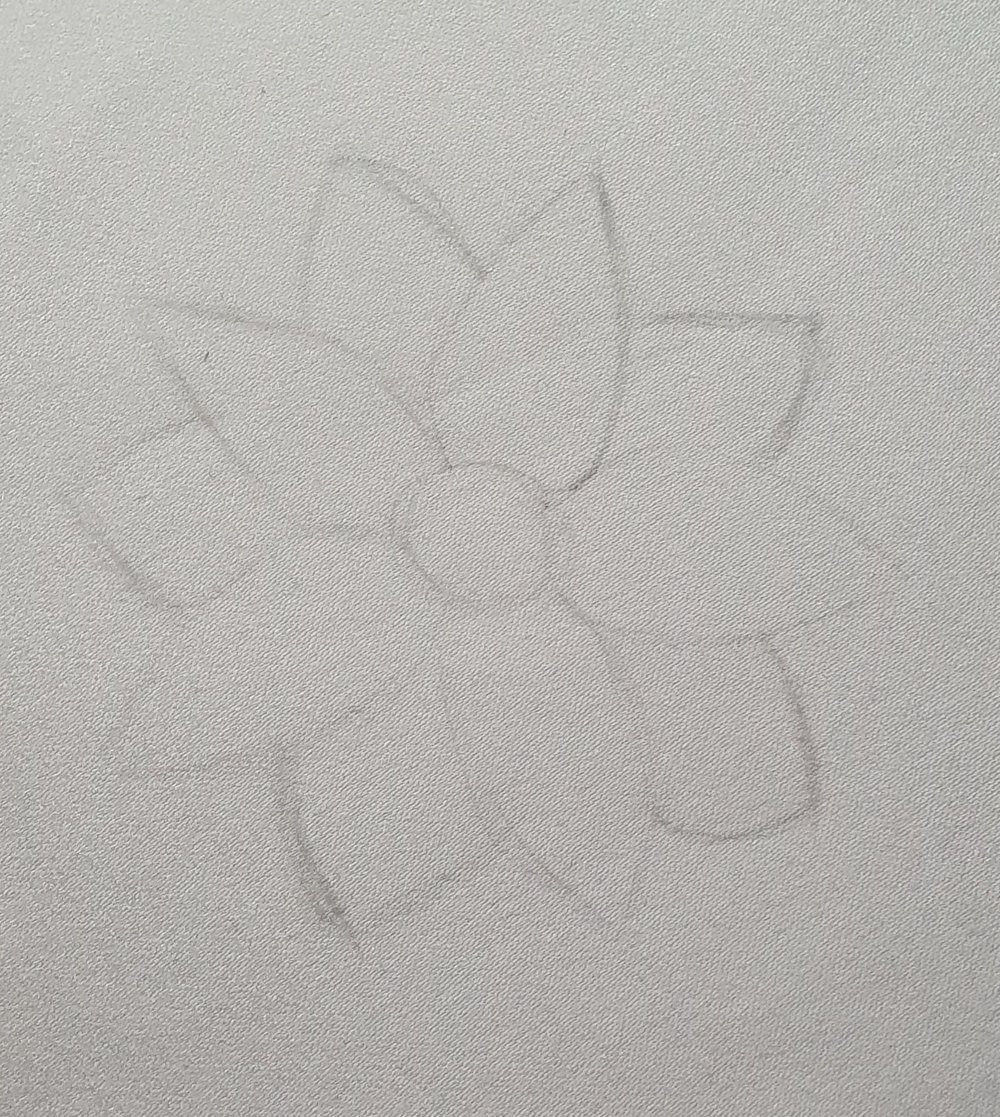
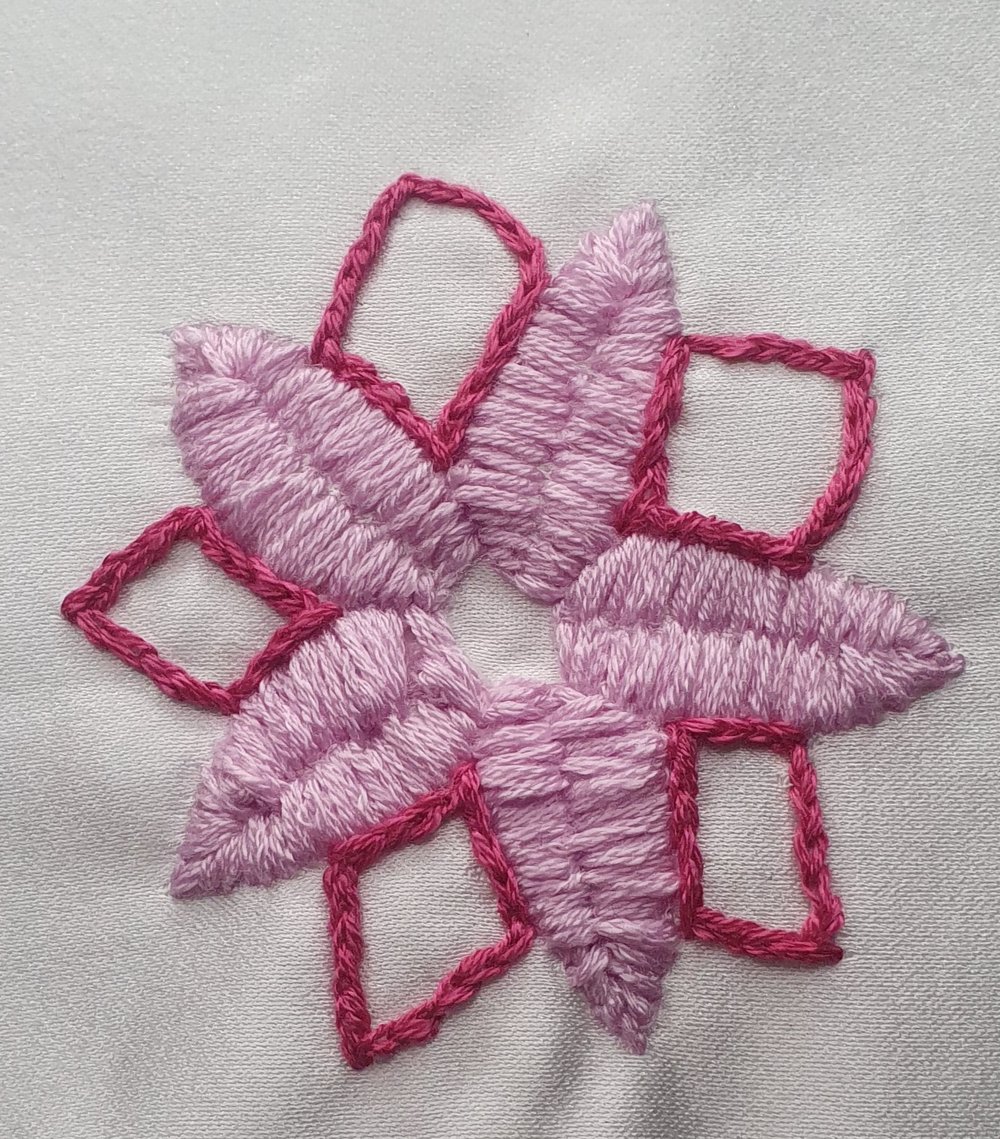
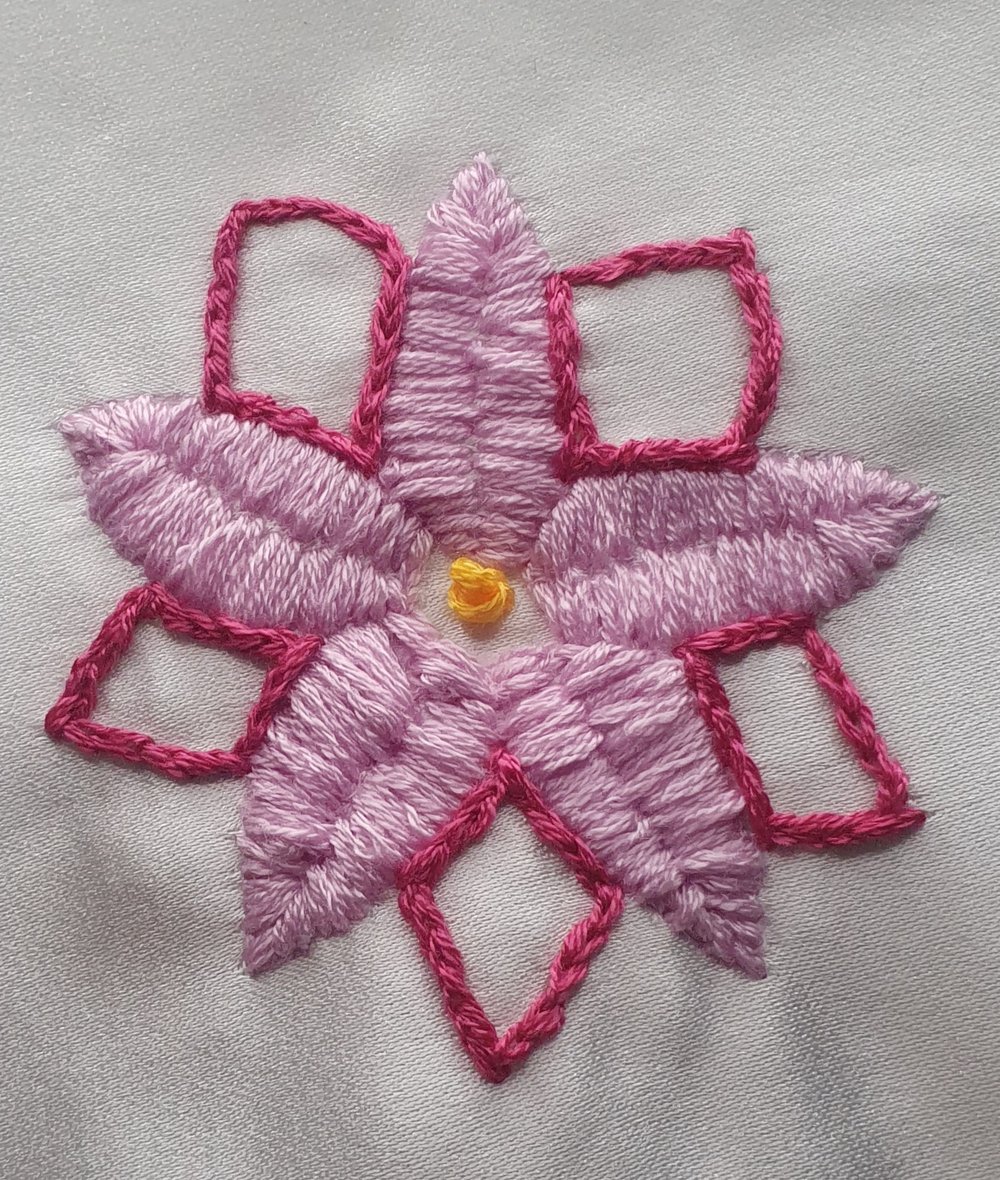
How to embroider a large satin stitch flower
This satin stitch flower can be done in any size, but I made this the largest flower on my garment.
Step 1
To begin, I marked out the petals of my flower using a textile marker so I know how big it would be and where the petal would be.
Step 2
To begin embroidering the flower, you first need to back stitch around the petal you are working on and down the centre. After this, you'll need to fill in the petal using a satin stitch. This gives the flower a slightly 3D effect. Once the petal is filled in, it should be tied off at the back of the fabric.
Step 3
This process is repeated for the number of petals that you have drawn out for your flower.
Once all the satin stitch petals are finished, I added some back stitch to the petals between each of the other petals. To do this, I simply back-stitched around each of the second layer of petals I marked out.
Step 4
To complete this flower, I placed numerous French knots in the centre of the flower that had been left empty. I used enough so there's no space left.
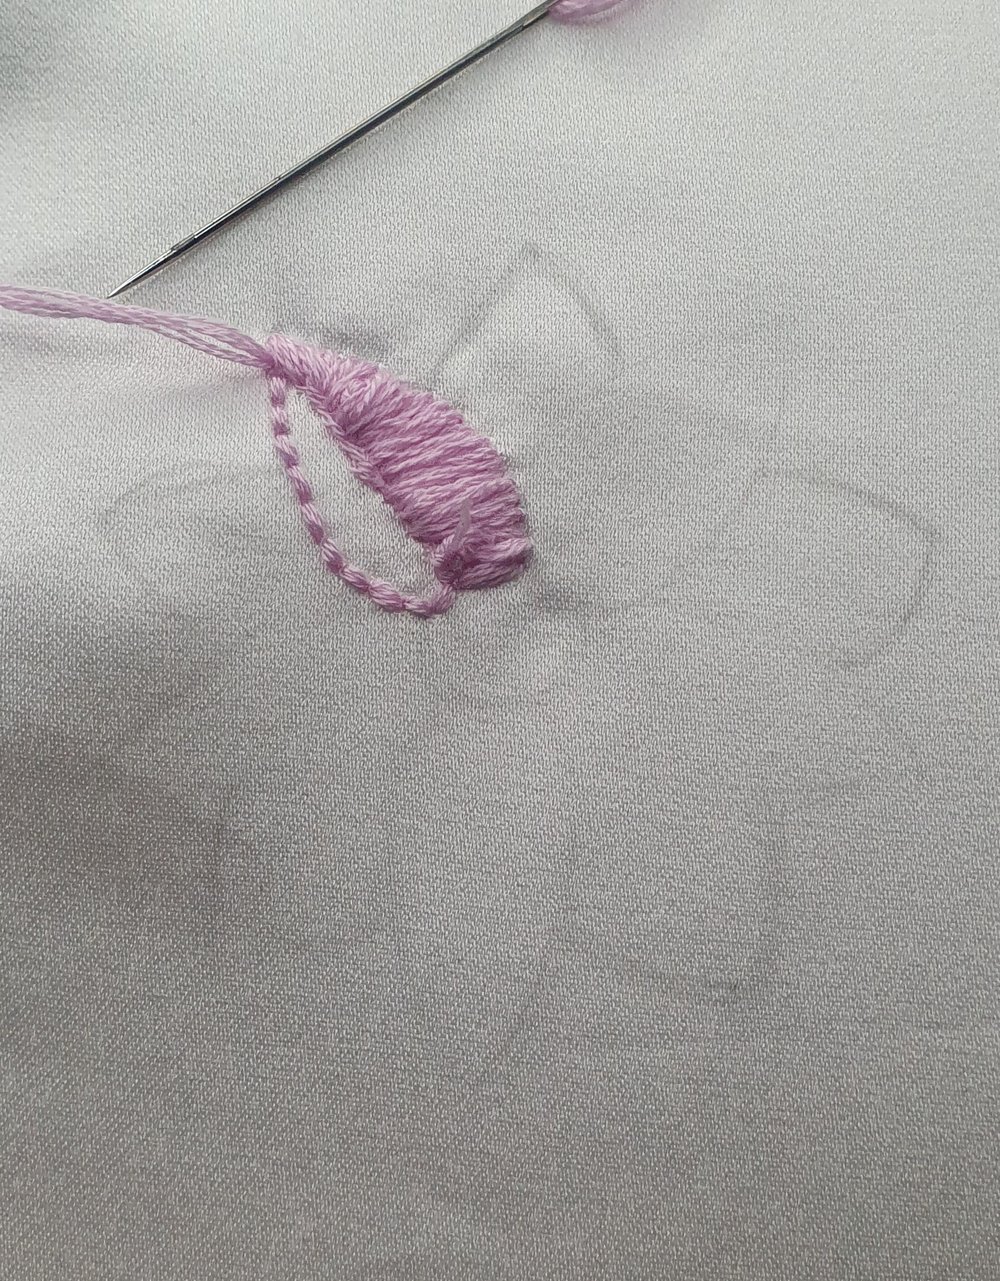
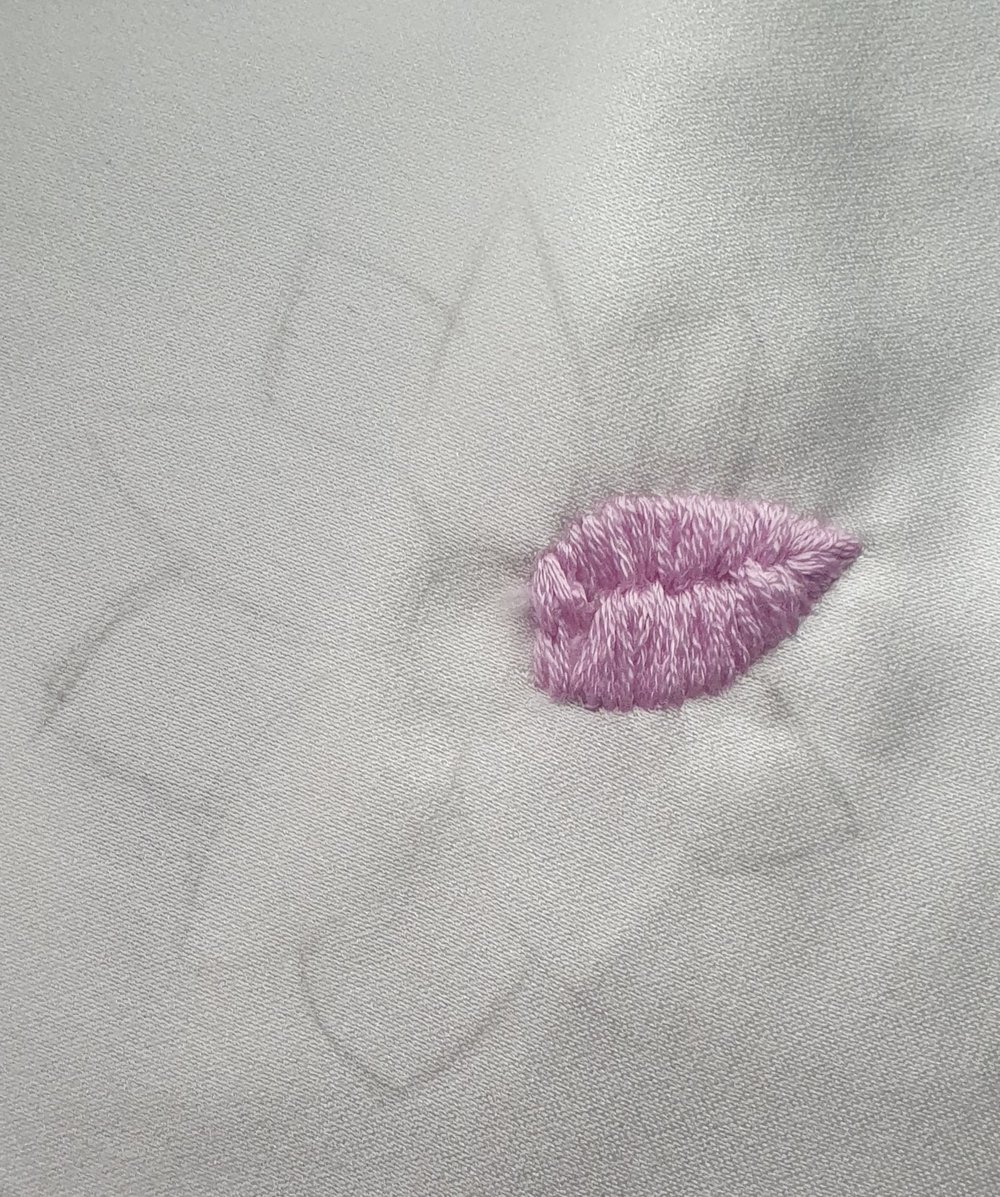
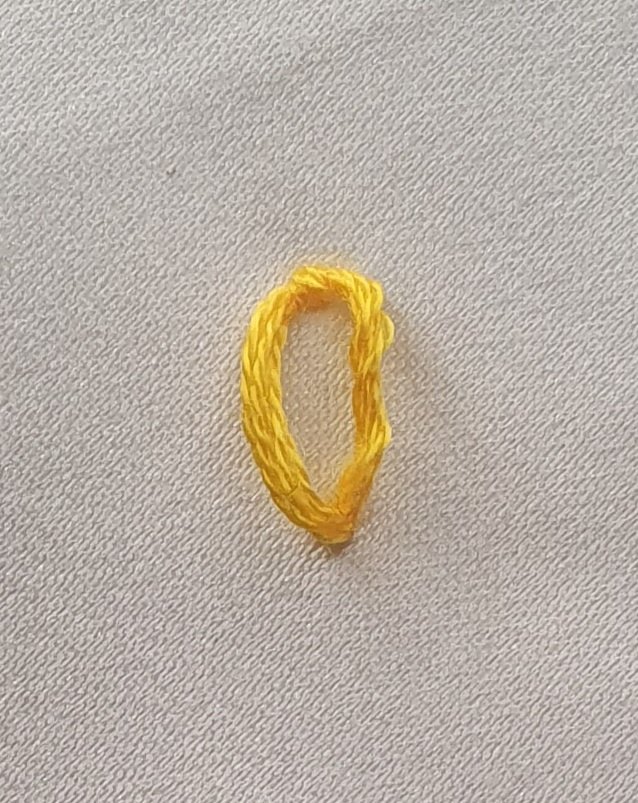
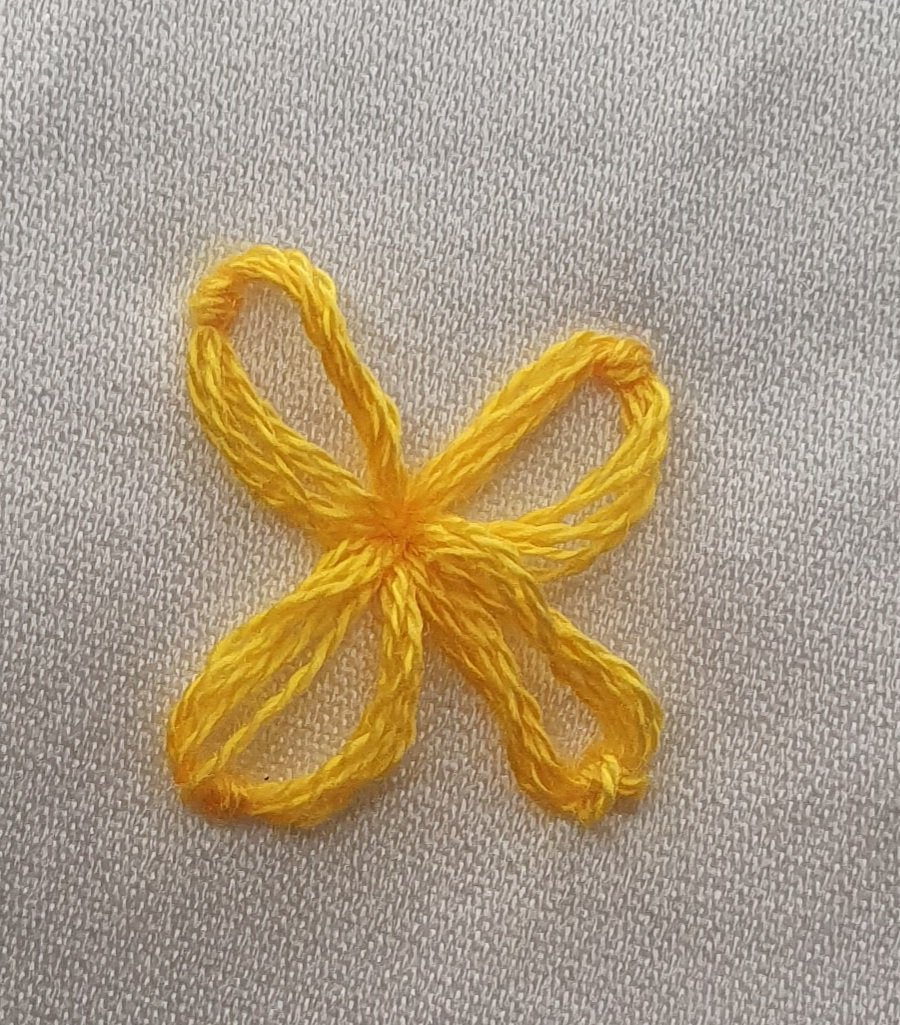
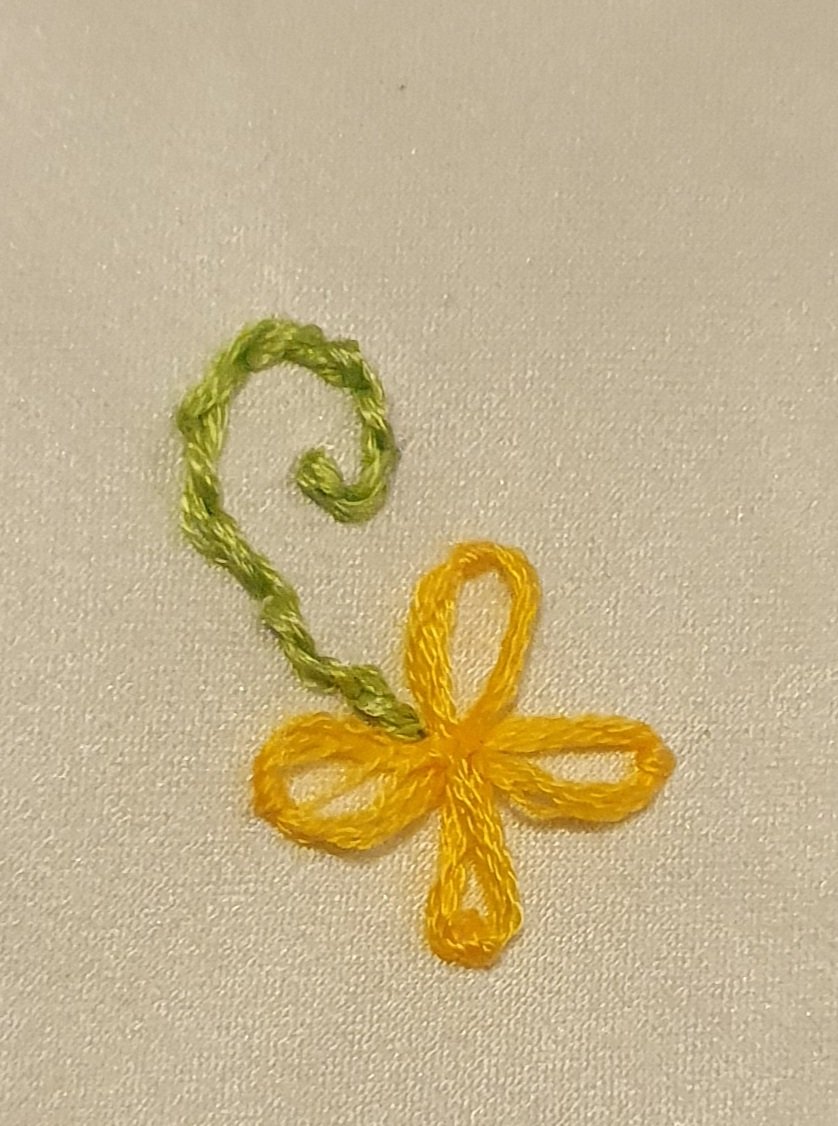
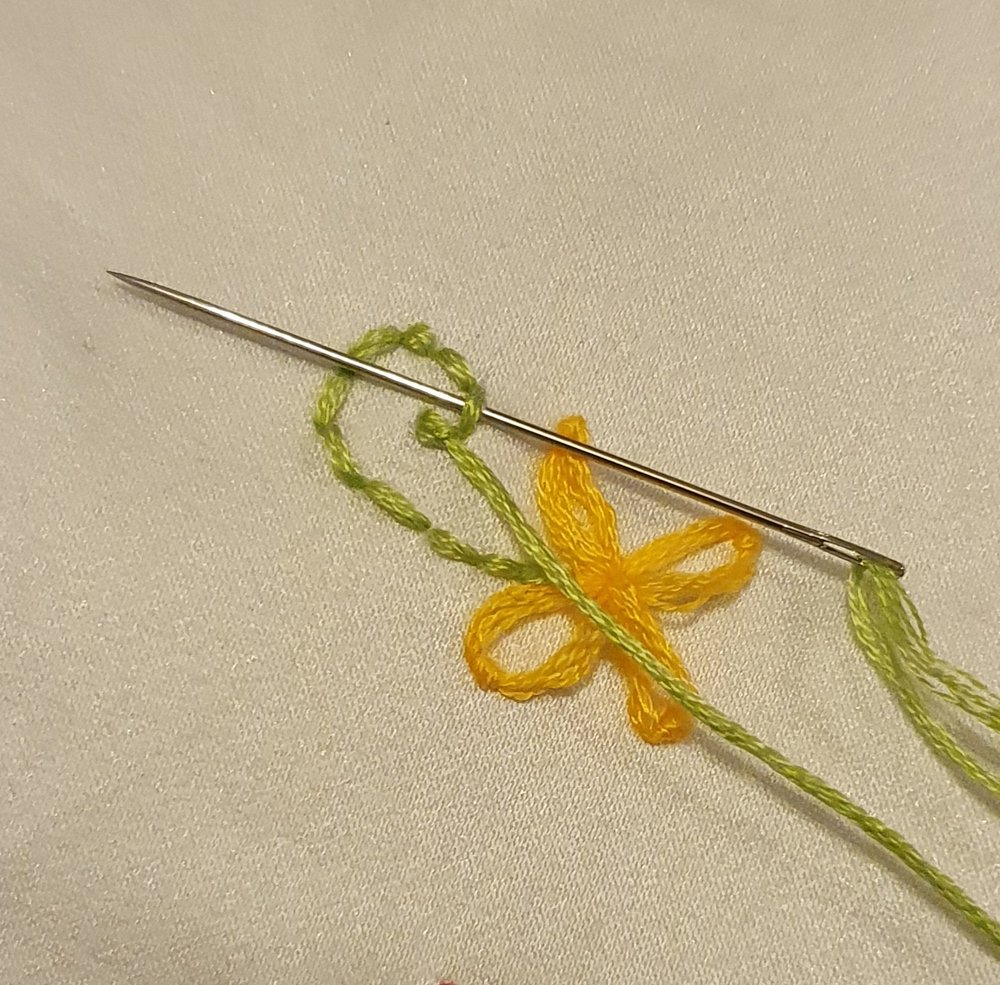
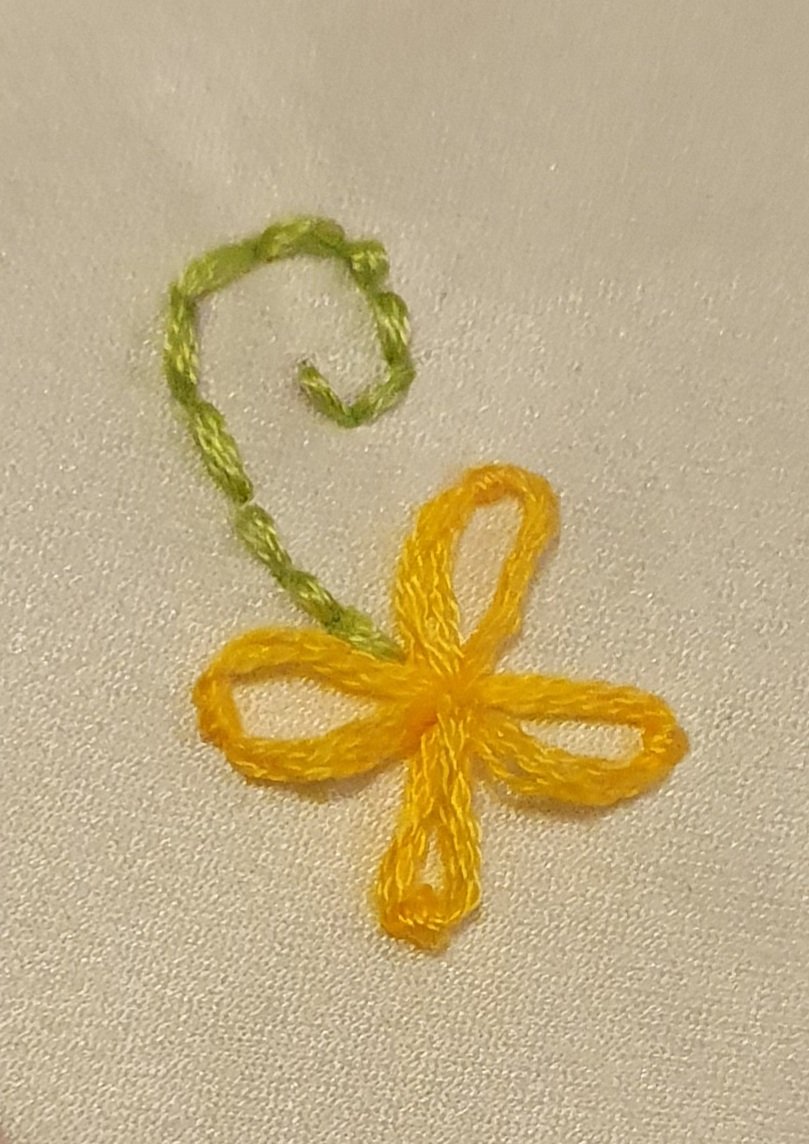
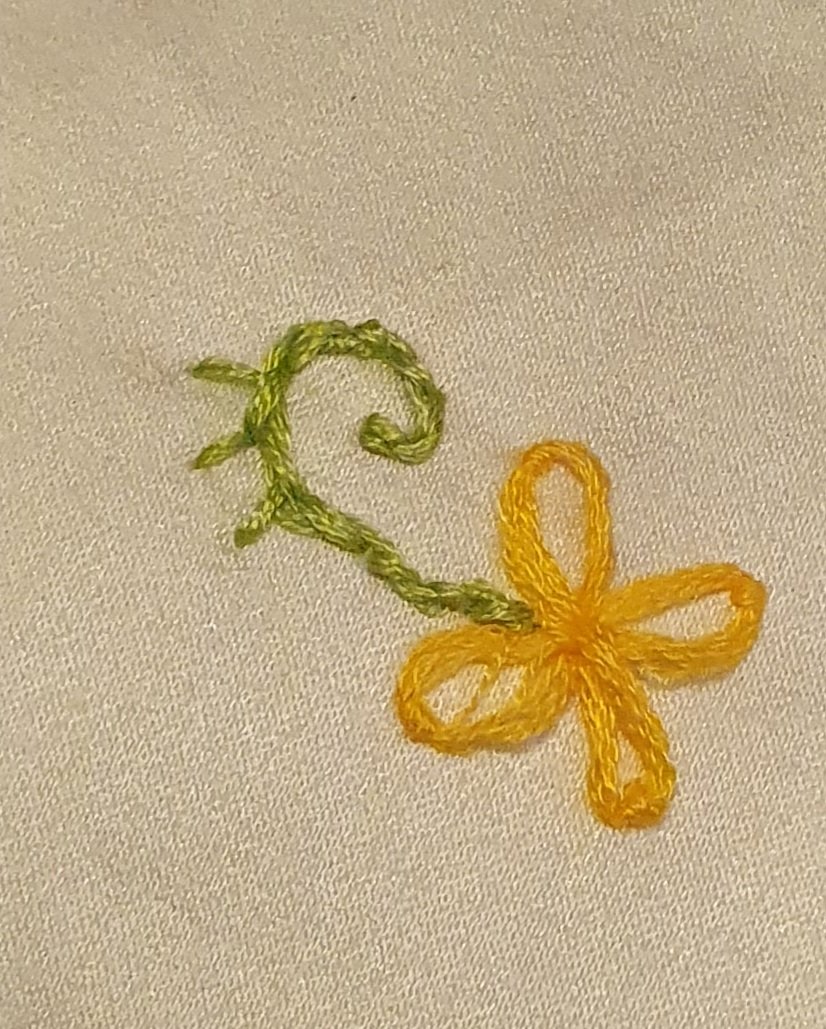
How to embroider a small flower
Another type of flower that you can use is this simple small flower. This flower can be done in any size, using different thicknesses of threads.
Step 1
To begin, go through from the bottom to the top of the fabric where you want the middle of your flower to start. After this, go back down through the same hole leaving a loop at the top of the fabric.
The needle should then come out where you want the tip of your petal to be, looping through the centre of the loop that you left previously. The needle should then go back down through where you want the tip of your petal to be. Once the thread is pulled tight, this creates your petal.
Step 2
Repeat this process for as many petals as you want for the flower. I used four petals for my flowers.
How to embroider a swirling leaf
Step 1
To create a swirling leaf, you first need to mark out where you want the swirl to be. After this, you simply follow the pattern using a back stitch.
Step 2
After the back stitch is completed, I wove the thread back through each of the stitches to create a vine effect. To do this, you simply go through one side of the stitch on the surface of the fabric and back through the other side.
In my example, I created three stitches that spread from the long part of the swirl. This is optional – you don't have to do this.
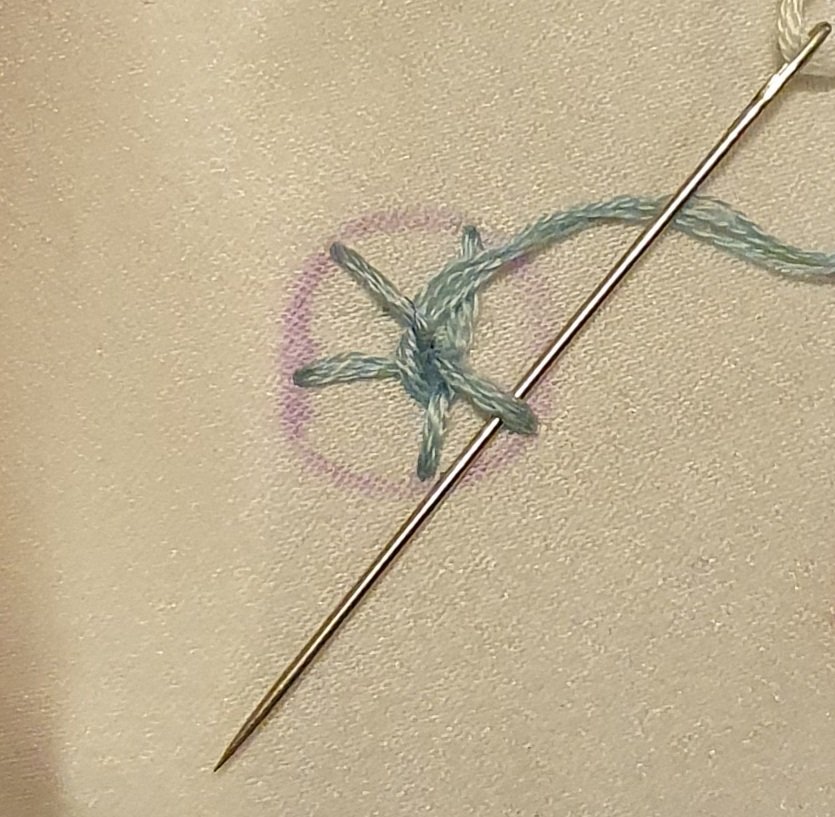
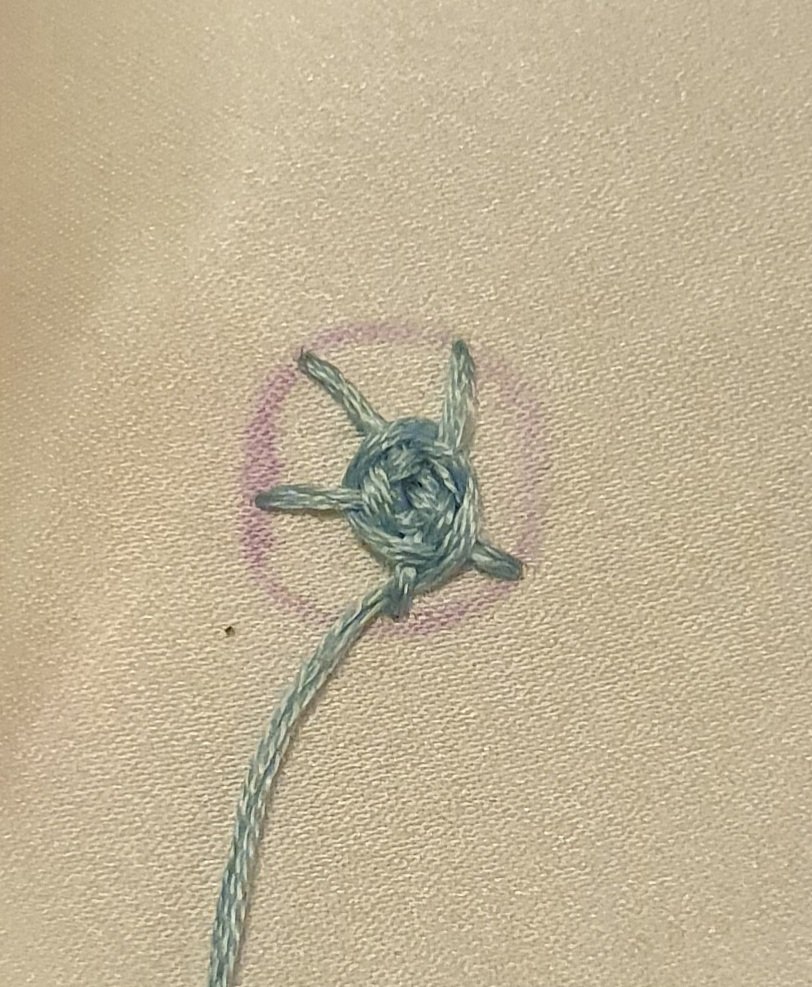
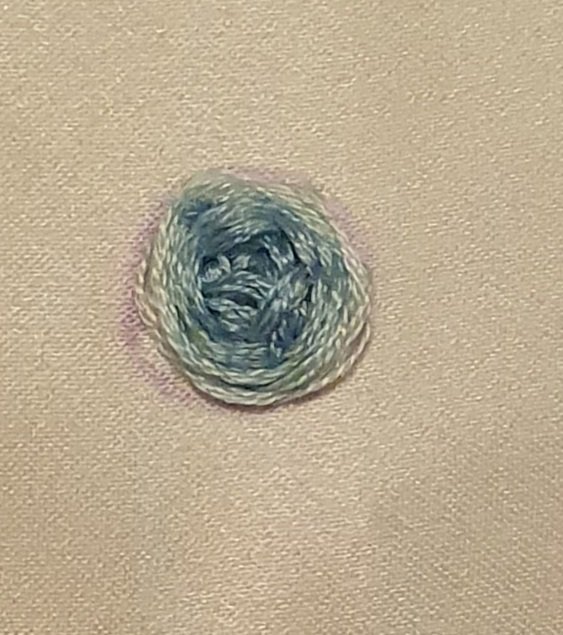
How to embroider a woven rose
Step 1
To create this woven rose, you first need to mark out a circle that you want the size of the rose to be. In the centre of the circle, pull the yarn through, then create multiple stitches from the centre of the circle to the edge of the circle. You can create as many stitches as you would like so long as the number of stitches is odd. I used five stitches.
Step 2
To create the 3D effect of the rose, you simply need to weave over and under each stitch until you reach the outer circle you have marked. After this, you simply pull the thread through to the wrong side of the fabric and tie off.
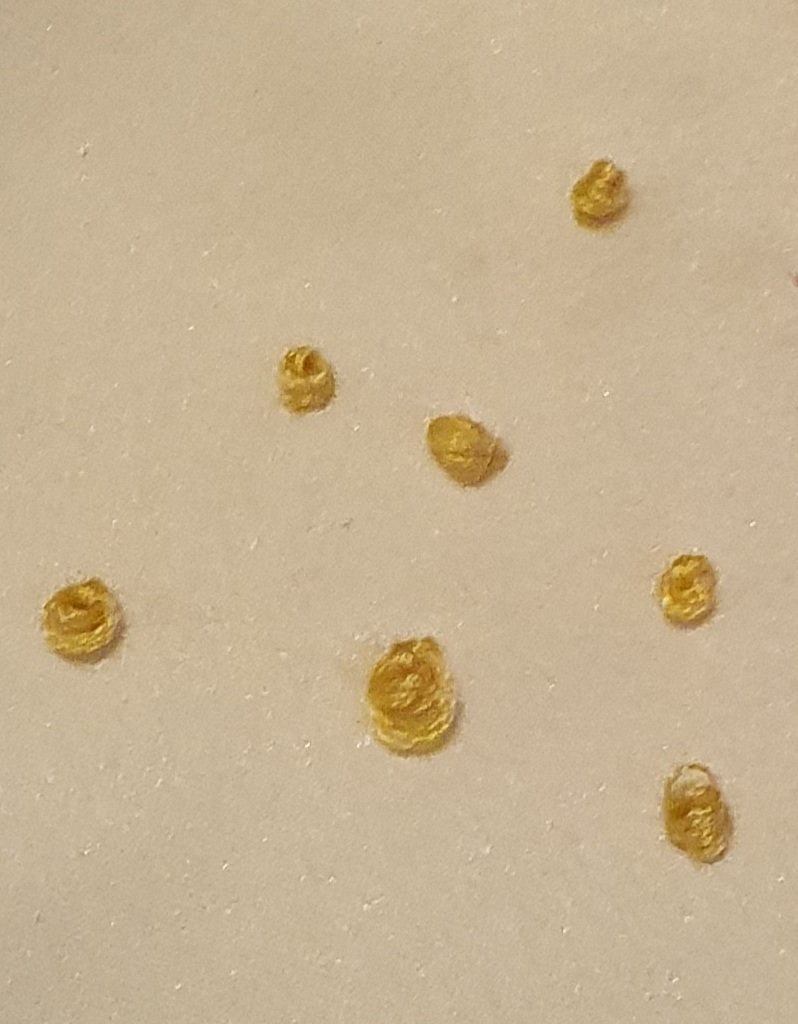
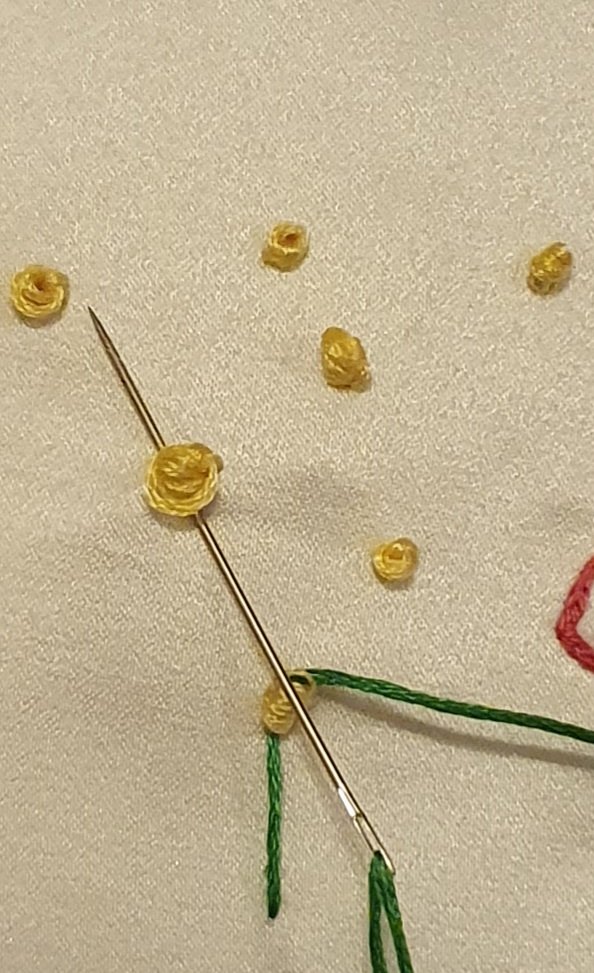
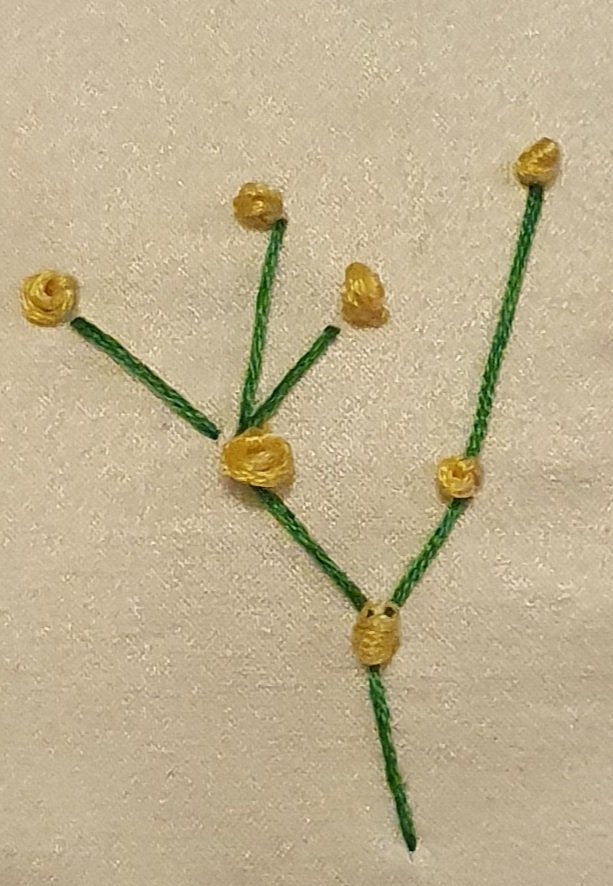
How to do a French knot bouquet
Step 1
For this French knot bouquet, I first created a random selection of French knots across the area I wanted to cover.
Step 2
After I laid out the French knots, I simply connected them using long stitches in a way that looked organic. This created the appearance of a bouquet of flowers.
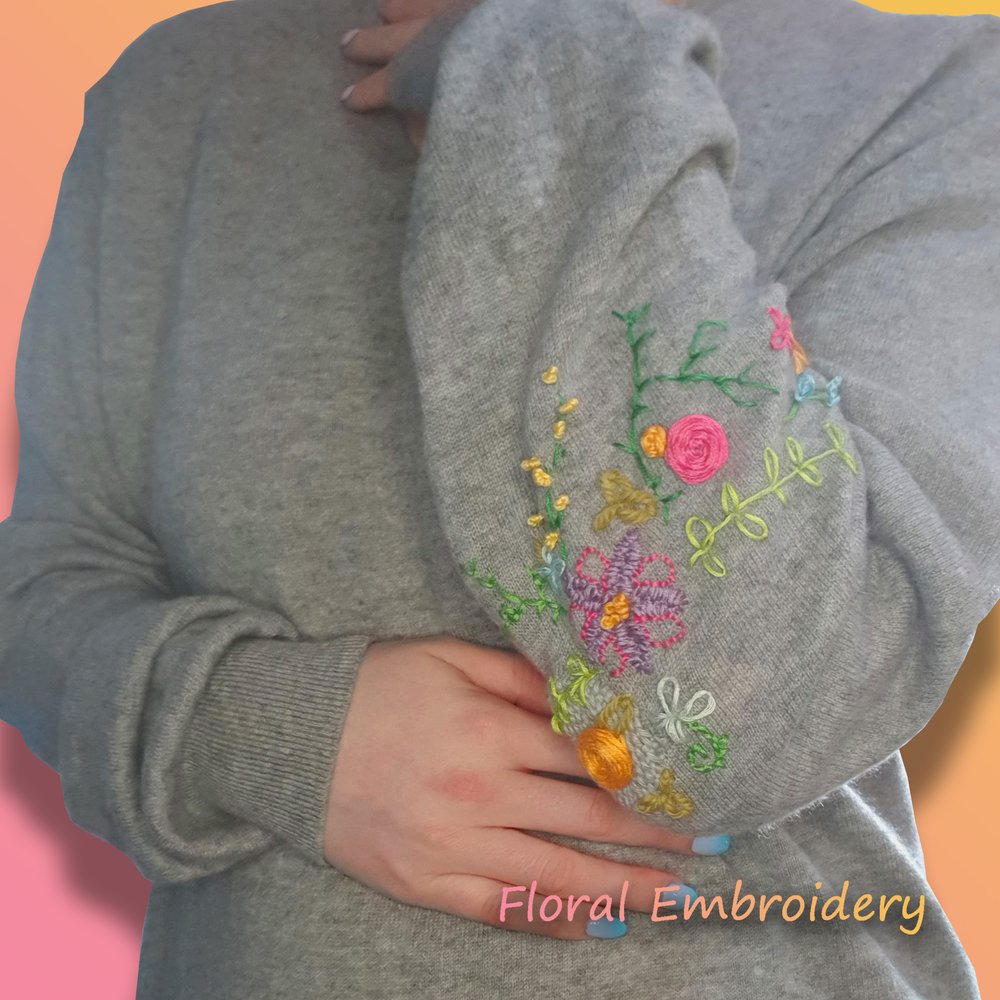
How I use these embroidery techniques to create my own look
All of these techniques for creating embroidered flowers can be used in various combinations to create your unique look. Here's a peek at how I used these techniques to give a damaged cashmere jumper a new lease of life.
I hope these example techniques will help inspire you to pick up a needle and thread and help your clothing last longer!